Friday, August 30, 2013

Do It Yourself: String Art


How to Make a Word Into String Art

Here are quick directions to make your own! This project can take a little over an hour to nail enough pins so make sure to budget time for it! The total cost of this project for me was under $4.00. Comment with questions!


Materials:
  • Wood board - You can find ones that are 9x12 at Michaels for $2.99
  • Print out of a word you want to make into string art
  • Paint for the outsides of your wood
  • Paper for the background of board
  • Paint brushes
  • Tape
  • Embroidery thread in the color you like (I found mine for .49 in Michaels)
  • Mechanical Pencil
  • Hammer
  • Pins or Nails
Directions:
  1.  Start by painting the edges of your board
  2. When dry, use mod podge or glue to adhere the paper to your board 
  3. Cut out your word as close as you can to the letters and tape down onto your board
  4. Start by hammering pins around the outer edge of the letters (I would suggest a font that runs together like script. It makes it easier when doing the string)
  5. Keep hammering nails until all the edges of the letters have evenly spaced nails
  6. Take the tip off a mechanical pencil and feed the embroidery thread through the end
  7. Tie the end of the string to the top of your first letter and cut the ends off
  8. Start running the thread around the outside of the first letter wrapping it around every few nail heads
  9. When outline is finished fill in letter by going from nail head to nail head 
  10. Continue this pattern until all letters are filled in
  11. When you get to the end of the last letter tie off the string
  12. Hang it on your wall and enjoy! 

*When finished with the nails rip the paper over the top one letter at a time so you don't lose the original shape of the letter. Learn from my mistake and don't rip the whole paper off at once! I couldn't find the shape again of a few letters and had to redo it with a different word!* 
Materials

Paint board

Make sure to space the nails apart evenly

Finish the entire word before adding string

Keep hammering nails until all letters are filled in
When finished with the nails rip the paper over the top one letter at a time so you don't lose the original shape of the letter.

Feed embroidery thread through end of mechanical pencil
How string will look from above

Make sure the letters are filled in enough!

Finished!


Stay Crafty!

Rina 

Thursday, August 29, 2013

Wedding Planning Quick Tips: The Guest List


How To Pick Who Makes The Cut

Ask any Bride what the hardest thing was in the planning process. If it wasn't the budget, it was the guest list. There are a lot of reasons that this task becomes the most difficult. I'll go through some tips on how to create, manage, and decide on your future guests.
 
Meg Ann Photography http://megannphotography.com/

Make an Initial List

This list will be a rough.. rough.. rough.. draft of what the final guest list will look like. Make your own and have your fiance make his own too. My suggestion is to start with family. You will have a good idea of who will all be attending on your side and that they will be set in stone as well. Start adding in your closest friends and spouses of your wedding party. Make sure to remember parents of good friends who you would like to see there.

Start with just that. See where you are and add in your fiances first list as well. Is it far off either high or low from what you guessed? If it's extreme in one way or another you may need to reevaluate your budget. (We'll get to that later)

Who Do You Leave Off?

A good rule of thumb when it comes to weddings is if you haven't seen or spoken to a person in over a year, they don't make the cut. "But he was my best friend when we were 6!" Yes, but you don't spend time with this person, have a daily relationship, or even an occasional drink with them so why would they need to come to your wedding? This is where it gets tough but you need to be brutally honest with yourself and each other because at the end of the day it's about the two of you not someone who's feelings might be bruised for a day or so. 

What's the Magic Number?

Most venues have a max amount of people they can accommodate at seated tables. This should give you a pretty good idea of what you are working with if you've looked into a couple venues. At this point you should have chosen a budget and it should be fairly clear how much money you are able to spend. If you get quotes from caterers about price per plate it will help you bring it down to a close number of people. Ours was 300. It seems huge but after we started making our lists, we realized we would actually have to cut back on guests!

We went to a few venues and talked numbers. Guests and price per plate that is. It really helped us shape to a certain number of people we could host.

I would highly suggest doing this before picking a number at random and basing your list off that.

How to Divide by Groom and Bride

My family is significantly larger than my husbands so therefore I was bound to have a higher number than his. But at first we split it half way. I would get 150 and so would he. It really helped me look at who I wanted there the most. It's your day but it's not just about you. Make sure everyone has a say in who can come.

How Many Guests are Your Parents Allowed?

This can be a tough one especially if your parents are helping cover costs for the wedding. They will always feel obligated to invite friends who had invited them to their own kids weddings. They also will want to invite coworkers and old friends they stay in touch with. Make sure to set some limits here because the guest list can get out of hand quick with this theory!

Invite Your Friends

This is where the party is! Your friends will be the ones that will stay on the dance floor keeping the mood up all night. As current and fun as the music is, it will never be a good dance unless people actually get out there! Inviting friends is the best guarantee to have a good time!     


Stay Crafty!

Rina


Wednesday, August 28, 2013

Washday Wednesday: Printable Goal List


 Easy Way to Organize Your Life!

If you're like me than you have lists for everything! This year especially the lists seemed to triple! Between planning a wedding, getting married, shopping for a house, then buying our first home, having a major career change, and bringing my now husband home from the Marines... lists have been my best friend! 

I'll explain how I use this template at home and at work. It's a very simple way to keep your thoughts organized, to-dos in check, and helps motivate you as well!


Things Needed:
  •  First, click below to print your free "To-Do-List"
Click Here for To Do List Template
  • Pad of sticky notes - bright colors always make chores more fun!
  • If available - laminating sheets/laminator 
Directions:
  1. Pick what your to-do list will be for (My example is chores)
  2. Write out on sticky notes the 5 things you want to get done either that day/week
  3. Simply place sticky notes on the squares
  4. Hang list some where visible as motivation to finish your tasks
  5. When finished with a chore/job peal the sticky off and you'll see beneath "Done!"
  6. Either replace with a new task or wait until the sheet is cleared to fill it back up again!
I have one I use in my office for daily tasks as a reminder of what I have to finish. I also have a chore one at home that's less urgent but is still a good visual for household jobs!

An easy way is to hang your list on a clip board - you can find colorful ones at the dollar store!

Here's my current list!
Stay Crafty! (And organized!)

Rina

Tuesday, August 27, 2013

Do It Yourself: Wedding Card Book

How To Make a Book Out of Wedding or Shower Cards


Items Needed:
  • Paper for the cover of your book
  • White foam board - You can find this at the dollar store
  • Binder Hooks - Office Max 3.99 Pack of 9
  • Hole punch
  • Scissors
  • Cards from wedding, bridal shower, birthday, or any other occasion 
Directions:
  1. Take your largest card and lay it onto the foam board. Leave at least a half inch around each side then mark with a pencil where to cut
  2. Use a scissors to cut out the bottom board. Then cut out a second board in the same size
  3. Use your cut out board as a stencil for your paper. Depending on the size of your board you can wrap the paper around the back or cut it out to fit exactly to the front. I used the same paper on the outside of both boards
  4. Glue paper onto boards - you can add any touch of flare to your cover!
  5. Punch holes into boards using a double punch. If you only have a 3 hole punch you line the card up right so only two holes catch. If you only have a hand held punch measure out each card so that the holes are even and in line with the previous one
  6. Punch holes in all of your cards - make sure they are even and in the same spot as your cover boards
  7. Feed one binder clip through the cover board. Then all the cards - make sure they line up with the correct punch hole. Clasp the binder clip then do the same thing through the other punch hole with the remaining loose cards.
  8. Display your book!

Materials

Choose your paper for the cover

Line up card to foam board leaving 1/2 inch around the edges

Cut your front and back boards and paper to the same size


Punch holes in cards making sure they're in the same spot


Feed binder clips through boards and cards making sure they line up

Enjoy you new book!


This is a great way to hold onto all those cards you have in a shoebox! I had a ton of cards from all my bridal showers and of course our wedding which are now all in their own bound books on our bookshelf! 

I later added a picture from that day to the cover of each book so I could remember which shower they were from. This is a good way to keep track of birthday cards too! The possibilities are endless!

Stay Crafty!

Rina

Monday, August 26, 2013

Wedding Planning Quick Tips: Too Many Ideas Not Enough Realism


From Concept To Creation


Huge Thanks to Meg Ann Photography http://megannphotography.com/

How can you visualize what your put together wedding will look like with just ideas and pictures from magazines? It can be so overwhelming thinking about the end picture when you're just starting out with the wedding planning process. Here are a few tips to rationally choose wedding decor and ideas without getting stressed out!

You Have Too Many Ideas

 It's super easy to over saturate and overload your brain with ideas and thoughts. Between wedding expos, Pinterest, bridal magazines, and friends weddings you've attended, it can become an overhaul of big plans and even bigger wish lists. 

Make a Look Book

This is simple, fun, and the first thing you should do after you decide on your budget. Start cutting out pictures you see and glue them into a notebook or onto paper in a binder. It may sound silly but it's the best way to visualize the end result! Make sections by dividing up ideas for flowers, cakes, venues, decor, and dresses. This will help you when you start to meet with vendors for them to get an idea of what you want as well.

I carried around my look book and it relieved a lot of stress when people started asking questions about decisions I hadn't made yet. I could show them my binder and say, "I'm not sure but this is what I like." It took loads of stress off and helped me make final decisions!

Set Goals of What You Want the Most

Make a goal list in the beginning of any decor or ideas that you know you will hand make. This can quickly get out of hand if you're not on top of it. Say you want to make your centerpieces. Decide on an idea and set a goal date of when you will have bought all the materials and when you will start assembling them. This will keep you on track and alleviate stress closer to the wedding.

Also set goals of when you want everything booked by. This means that by your certain date you should have met, experienced/tasted, and signed contracts by your set goal date. This will also help you free up time to work on projects and feel calm about your approaching big day!

Make a Model of Your Decor Idea

This is the best advice I can give any bride to be. 

I wanted to hand make my centerpieces (genius I know) because I couldn't find anything I liked! I wanted to use cupcake stands as the focal point because they were easy to pack up and we could reuse them unlike flowers or candles. It was an ungodly process trying to figure out how and what I was going to make them out of. I went through at least 10 ideas before I settled on the ones above.

Once I had my final idea (sorry everyone involved) I timed out how long it took to make one. This way I could figure out how long it would take to mass produce these. Once I figured that out I knew I needed to cut back on other ideas because it was too much time spent on one thing. I went for a more simple look under the cupcake stands using cuts of fabric and flower heads instead of real candles and handmade burlap/lace table runners.

Mass producing anything can be really stressful if you don't time it out before hand. It's unexpected how long some things can take especially if you don't have a lot of help.

I advise every bride to be to use this! Think of the time you'll save!

Meg Ann Photography http://megannphotography.com/
Here is another example of my brilliant idea to over stress myself. I could not find lantern stands for going down the aisle. Anywhere. So I hand made them of course. If I hadn't made a prototype before hand these probably wouldn't have happened and I would have been very upset about losing this look. They weren't hard to make but the time they took was far more than planned. It took my dad, father-in-law, mom, mother-in-law, fiance, and myself weeks to finish these. Between finding the posts, bending the wire, finding pots, cutting fabric, cementing them, spray painting them, wrapping the fabric on the base, and finishing it off with a bow... WHAT WAS I THINKING! 

Trust this bride, make a prototype it will save you a world of headaches later on!


What Can You Delegate?

Most brides have a problem with this, including myself, and it's normal to want to do everything on your own. However, realistically you can't. There are so many things you don't need to be present for but that still need to get done! Here's a list of things you should and need to hand off to bridesmaids, parents, or even your fiance!

  • Getting stamps for invites, thank yous, and save the dates
  • Picking up materials needed for projects like spray paint, fabric, and frames
  • If you have one and you need more just let someone know where you got it! This applies to everything in the wedding. Let's say you need 10 more candles from Target - send someone else! 
  • Folding/assembling programs: This can be a job for anyone in your family. Just give them a prototype and let them have at it. They will look exactly the same as you designed without your supervision
  • Have someone come with you to the first few meetings for cake, flowers, and tux fittings then send them to the last meetings or correspond via email. Nothing has changed since the first time you met them and nothing will change on your wedding day. Sending someone else to relay the same message you would have will save you TONS of time and energy. It's hard to do but you'll be thankful later!

Remember that everyone is always willing to help and you don't need to do it alone. You will have far less stress leading up to the wedding and you will let other people feel connected to your big day as well. It will be satisfying having the extra time and can free you up to do more projects you had your heart set on!

Stay Crafty!

Rina

Friday, August 23, 2013

Do It Yourself: Ikea Coffee Table Revamp | Crafts and Chaos

How To: Wood Top With Instructions and Pictures!


I love our Ikea coffee table. This thing has seen it all. It was a gift to me for my high school graduation and has since had many owners including all my newlywed friends. And with that much love comes scratches, dents, and stains.

It needed a makeover and with our own newlywed budget, a new coffee table wasn't in the plans.

I'm going to talk you through each step it took to create this look. I'll do a quick version if you're a DIY pro and only need materials and I'll do a longer explanation going through each step in detail for those starting out.

Look for bolded tips throughout the tutorial! 

Quick Tutorial

Items Needed:
  • Hand Sander
  • Power Saw
  • Sawhorse and Board
  • Sand Paper
  • Rag or Stain Cloths
  • Stain in the Color You Want
  • Wood Boards Fit to Your Table
  • Exterior Grade Caulk or Liquid Nails  
Directions:
  1. Set up your sawhorses with a board over top and cut boards to length leaving 1/2 inch overhang on each end of the board
  2. Use your hand sander to slightly round the corners and ends of each board. Depending on your wood type sand the top that will be facing up so you have a smooth surface
  3. Wipe down wood with a damp cloth to get all saw dust off. The dust will affect the look of the stain if left untouched.
  4. Once boards are wiped clean, start to apply the stain. Start at the end and make your way to the middle leaving both ends for last. The ends will always stain darker than the top face of the wood.
  5. Once your first coat is on let dry for 1 hour. 
  6. Apply second coat of stain to your desired coloring. For us, we wanted a more "rustic" look so we liked that it wasn't completely even. To each his own!
  7. Once the second coat is completely dry, bring boards inside and line them up on your table top. Arrange boards so the pattern of the wood flows to your liking! When done, keep boards in order but place on floor
  8. Start with your glue source on your table's surface. Make sure that all glue is at least 1/2 inch away from the edge. With the boards pressed down it could seep out if too close.
  9. Once you have an adequate amount of glue, press your first board down and make sure ends line up correctly.
  10. Once first board is in place, run a line of glue along the side that the next board will press against. Run glue on table top for the next board.
  11. Continue this pattern until all boards are glued down. 
  12. Place heavy boards, books, or other flat items on top of table and let sit overnight
  13. In the morning take everything off and enjoy your new table!
Detailed Tutorial With Pictures!

Items Needed:
  • Hand Sander or Coarse Sand Paper
  • Rag or Stain Cloths
  • Stain in the Color You Want
  • Wood Boards - Can use many different kinds | We used Cedar Siding in 1x6x6 (Need two)
  • Exterior Grade Caulk if You Have a Caulk Gun or Liquid Nails 
Directions:


1. First you need to choose your wood. I would suggest going to your local Home Depot. Make sure to take measurements of your table before going so you have the exact number of boards needed. If you go to Home Depot, they will cut your wood for you if you don't have the proper equipment at home.

We used Cedar Siding from Menards that measured 1"x6"x6' which is 1 inch in height, 6 inches wide, and 6 feet long. We only needed two boards since cut in half, it equaled the exact measurements of our table.

Once you pick your wood make sure to lay the boards against each other to see if they are warped or have a bend to them. If you don't do this in the store the boards may not line up when you get them home.

2. Once home, lay the boards on your table to 100% know they line up and that there aren't any defects in the wood. If everything is good then you're ready to start!

3. If you don't have sawhorses available you can easily use two garbage cans or tall boxes to lay your wood across. Start by lining your boards up in a way you like. Make sure the patterns in the wood look good the way you have them laid out.

Start sanding! If you don't have a hand held sander like the picture below you can use a regular piece of sandpaper wrapped around a wood block.


4. Sand down the tops of the planks. (Don't worry about the underside that will be glued down)
This process may take a while if you're doing it by hand. Make sure to evenly sand out any rough spots on the top of the wood. 


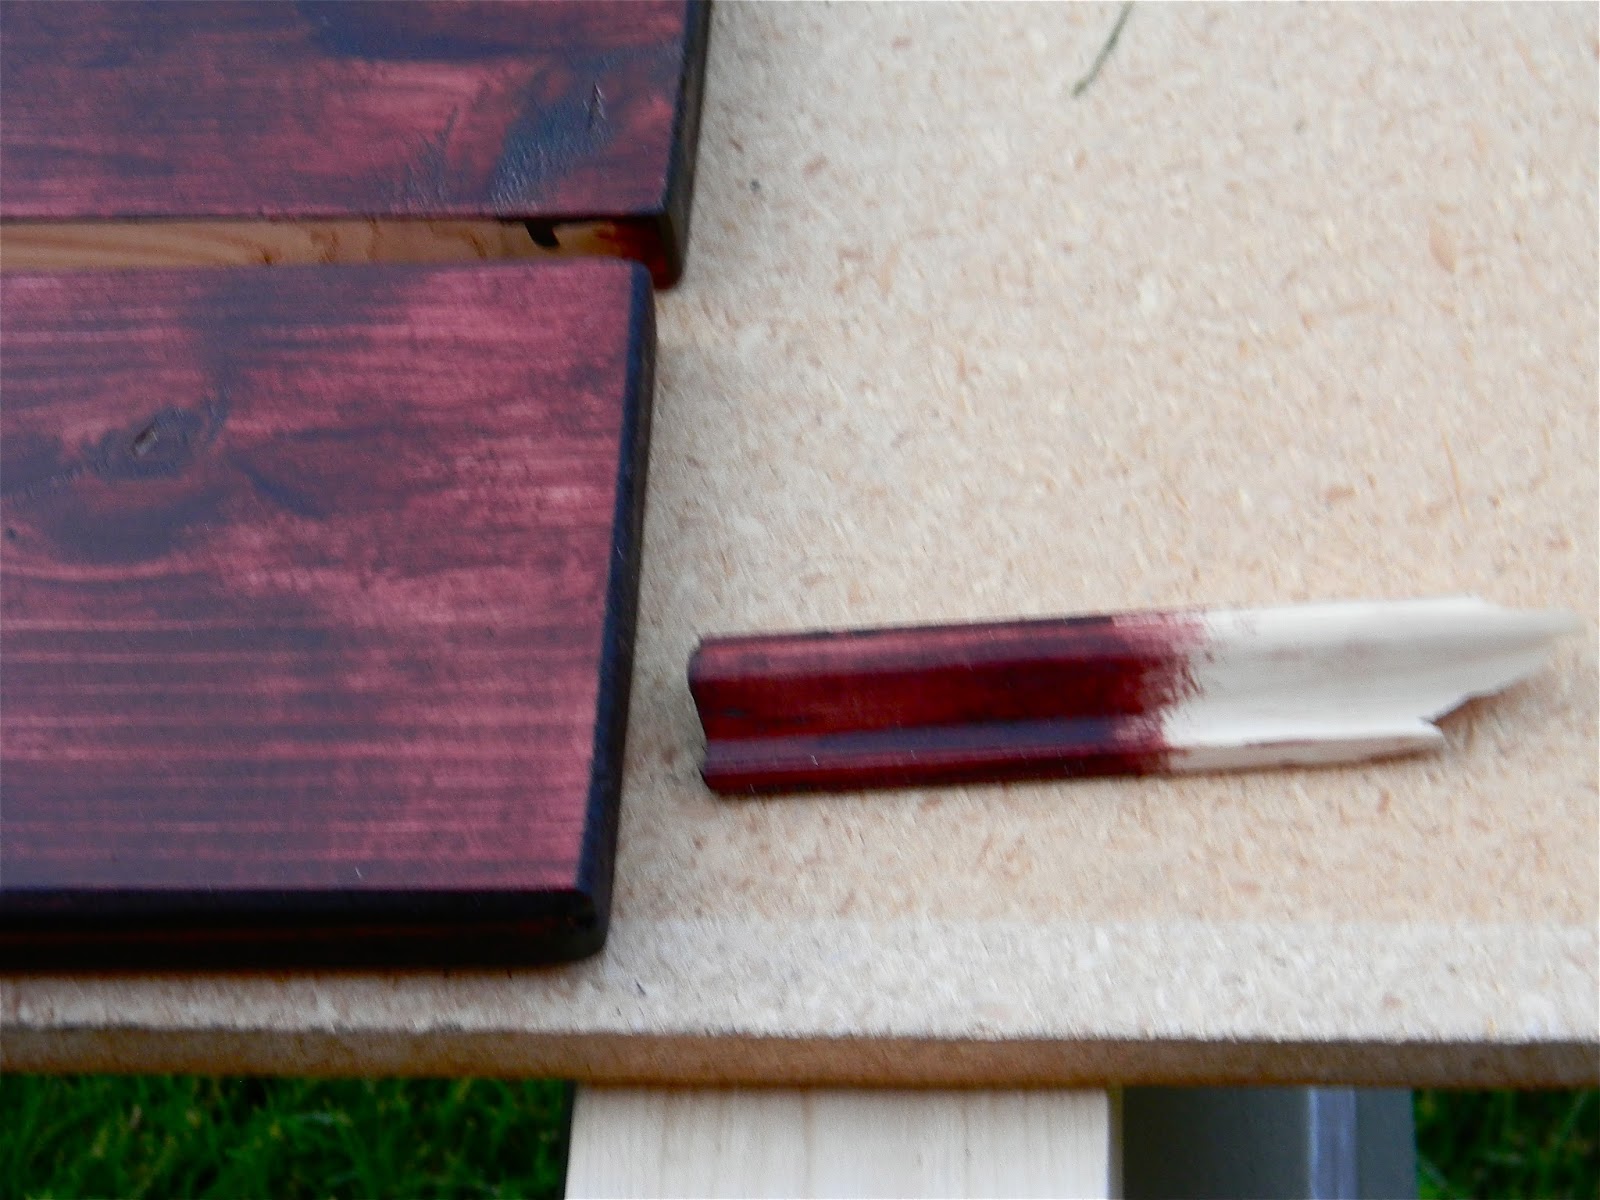
 5. Once the tops are sanded to your liking start sanding the ends. If you want a more rough or rustic look do not sand down any further than the picture below. The ends of boards are always more rough so do your best to smooth those out to your liking. 

We made a slight rounded edge on ours and left the bottom of the board flat to get a barn wood look. (Props to my loving husband for all his help!)


6. When all your boards are sanded to your desire wipe them down with a damp cloth. This step is actually really important because the extra saw dust left from sanding can affect the look of your stain. Let the boards dry out from the damp cloth before moving on.


7. You can finally start staining! Use an old rag you will toss after or staining cloths from the hardware store. Start by applying stain at one end of the board and working your way across. Don't start in the middle or your stain pattern may look different once you reach the end. Make sure to leave the ends for last. The end and sides of your board will stain much darker than the top. This is common and will turn out that way no matter what type of wood you use. 

*Remember* to stain the outside edge of your two end boards. DO NOT stain all inside edges or your glue or caulk won't stick as well.


8.  Let your boards dry for at least 1 hour. After that hour look at where your stain is and decide if you need a second coat. For the rustic look two light coats will get you what you want. If you want a more even coat two heavy coats or three light coats will stain even.


 *Remember to stain the ends last!*

We used PolyShades in Bombay Mahogany Satin - This also comes in a gloss from Menards


 *Do not stain insides of edges!*


*If your wood has knots or cool characteristics make sure to stain around the knot if it doesn't lay completely flat to the other board. What will happen is when you line your boards up you will see the unstained inside of the board next to it. Super important!* 


*This shows the stain on a lighter wood - Poplar or Pine - The stain may turn out different on different types of wood. We also used this as our stir stick!


9. Lay boards down one more time on your table. The stain may have brought out features in the wood and you might want them to lay different than you originally thought.


10. Start laying your first line of glue onto your table. Leave at least 1/2 inch between all edges and where your glue sits. If you don't, it could press out when your place your boards and it will be hard to get off. 

11. Lay an entire line of glue that is the width and length of your board. *Note* Don't use Gorilla Glue. Although great for most projects it doesn't adhere as well to lacquer glazed wood. It could cause you problems further down the road.
12.  Carefully place your first board on top of the glue making sure all the edges line up.


13. Run a line of glue along the unfinished inside side of your first board. This will help secure all your boards together for a long lasting effect.


14. Continue this process across the table laying each board snug against the last. Remember to run that line of glue on the unfinished inside of each board.


15. Place heavy boards on top of your glued boards. We used composite board we had in the garage. You could also stack heavy books making sure the weight is distributed evenly. 

Let sit over night 


*Trumpets sound* You're done!


Stay Crafty!

Rina